Linux 跨线程与跨进程的原子操作
众所周知,多线程对同一个变量进行操作,有可能导致结果异常,这是cpu的工作特性导致的。
背景&&原理
对一个变量做自增操作,CPU微观指令级别分成3步操作:
- 将变量的值加载进寄存器
- 对寄存器的值做自增操作
- 将寄存器的值写回变量
在单核系统中,上述过程可以正常进行,但是在多核系统中,可能会出现以下情况。
   +    +----------------------+----------------------+
   |    |    CPU0 operation    |    CPU1 operation    |
   |    +----------------------+----------------------+
   |    | read counter (== 0)  |                      |
   |    +----------------------+----------------------+
   |    |       increase       | read counter (== 0)  |
   |    +----------------------+----------------------+
   |    | write counter (== 1) |       increase       |
   |    +----------------------+----------------------+
   |    |                      | write counter (== 1) |
   |    +----------------------+----------------------+
   V
timeline
为了解决这个问题,硬件引入原子自增指令。
保证CPU0递增原子变量counter之间,不被其他CPU执行自增指令导致不想要的结果。
对于intel的cpu。使用LOCK 前缀:
LOCK (prefix): Perform atomic access to memory (can be applied to a number of general purpose instructions that provide memory source/destination access).
出自Intel手册Volume 1: Basic Architecture 的5.20 SYSTEM INSTRUCTIONS 一节
在汇编上,也可能是 XCHG 指令, 这个指令会自动加LOCK 前缀。
这部分可以参考Intel开发手册的Volume 1: Basic Architecture 的7.3.1.2 Exchange Instructions 一章。
关于intel处理器的原子操作部分,在开发手册的Volume 3 (3A, 3B, 3C & 3D):System Programming Guide 的 CHAPTER 8 MULTIPLE-PROCESSOR MANAGEMENT 一章有更详细的说明,其第一章就是加锁的原子操作。
(留个坑,这个地方有时间翻译一下手册的第八章部分)
目前,暂且假定原子操作在intel的cpu上是通过总线锁控制内存地址的访问或者缓存一致性协议(Cache Coherency protocols)来实现的。
线程原子操作代码
add_multithread.c 文件代码如下:
#include <stdio.h>
#include <stdlib.h>
#include <pthread.h>

#include <unistd.h>
#include <sys/types.h>
#include <sys/syscall.h>

#define WORK_SIZE 5000000
#define WORKER_COUNT 16
pthread_t g_tWorkerID[WORKER_COUNT];
int g_sum = 0;
pthread_mutex_t g_mutex;

pid_t gettid()
{
    return syscall(SYS_gettid);
}

void *add_worker(void *atomic_flag)
{
    // printf("Add thread id: %lu tid: %d use atomic: %d \n", (unsigned int)pthread_self(), gettid(), *(int *)atomic_flag);
    int i = 0;
    for (i = 0; i < WORK_SIZE; ++i)
    {
        if (*(int *)atomic_flag == 1)
        {
            __sync_fetch_and_add(&g_sum, 1);
        }
        else if (*(int *)atomic_flag == 2)
        {
            pthread_mutex_lock(&g_mutex);
            g_sum++;
            pthread_mutex_unlock(&g_mutex);
        }
        else
        {
            g_sum++;
        }
    }
    return NULL;
}

int main(int argc, const char *argv[])
{
    int method_flag = 0;
    if (argc == 2)
    {
        method_flag = atoi(argv[1]);
    }
    else
    {
        printf("Args Help:\n");
        printf("0: no sync \n");
        printf("1: atomic add \n");
        printf("2: mutex \n");
        exit(0);
    }

    pthread_mutex_init(&g_mutex, NULL);
    int i = 0;
    for (i = 0; i < WORKER_COUNT; ++i)
    {
        pthread_create(&g_tWorkerID[i], NULL, add_worker, &method_flag);
    }
    printf("Created %d add threads\n", i);
    for (int i = 0; i < WORKER_COUNT; ++i)
    {
        pthread_join(g_tWorkerID[i], NULL);
    }
    pthread_mutex_destroy(&g_mutex);
    printf("All add threads finished.\n");
    printf("The sum: %d Method: %d \n", g_sum, method_flag);
    return 0;
}
编译&&运行
只要朴素的编译方式:
gcc add_multithread.c运行获取非同步结果:
$ time ./a.out 0
Created 16 add threads
All add threads finished.
The sum: 9960636 Method: 0
./a.out 0  2.00s user 0.01s system 1037% cpu 0.193 total
这个由于没有控制变量访问,所以结果不对。
运行获取原子变量结果:
time ./a.out 1
Created 16 add threads
All add threads finished.
The sum: 80000000 Method: 1
./a.out 1  15.90s user 0.03s system 1141% cpu 1.396 total
这个结果是对的,每个线程跑500w 自增操作,有16个线程,结果是8000w,耗时1.396 秒。
运行获取互斥量加锁结果:
time ./a.out 2
Created 16 add threads
All add threads finished.
The sum: 80000000 Method: 2
./a.out 2  19.04s user 49.10s system 1102% cpu 6.182 total
这个结果也是对的,但是耗时比原子操作多很多。
汇编代码
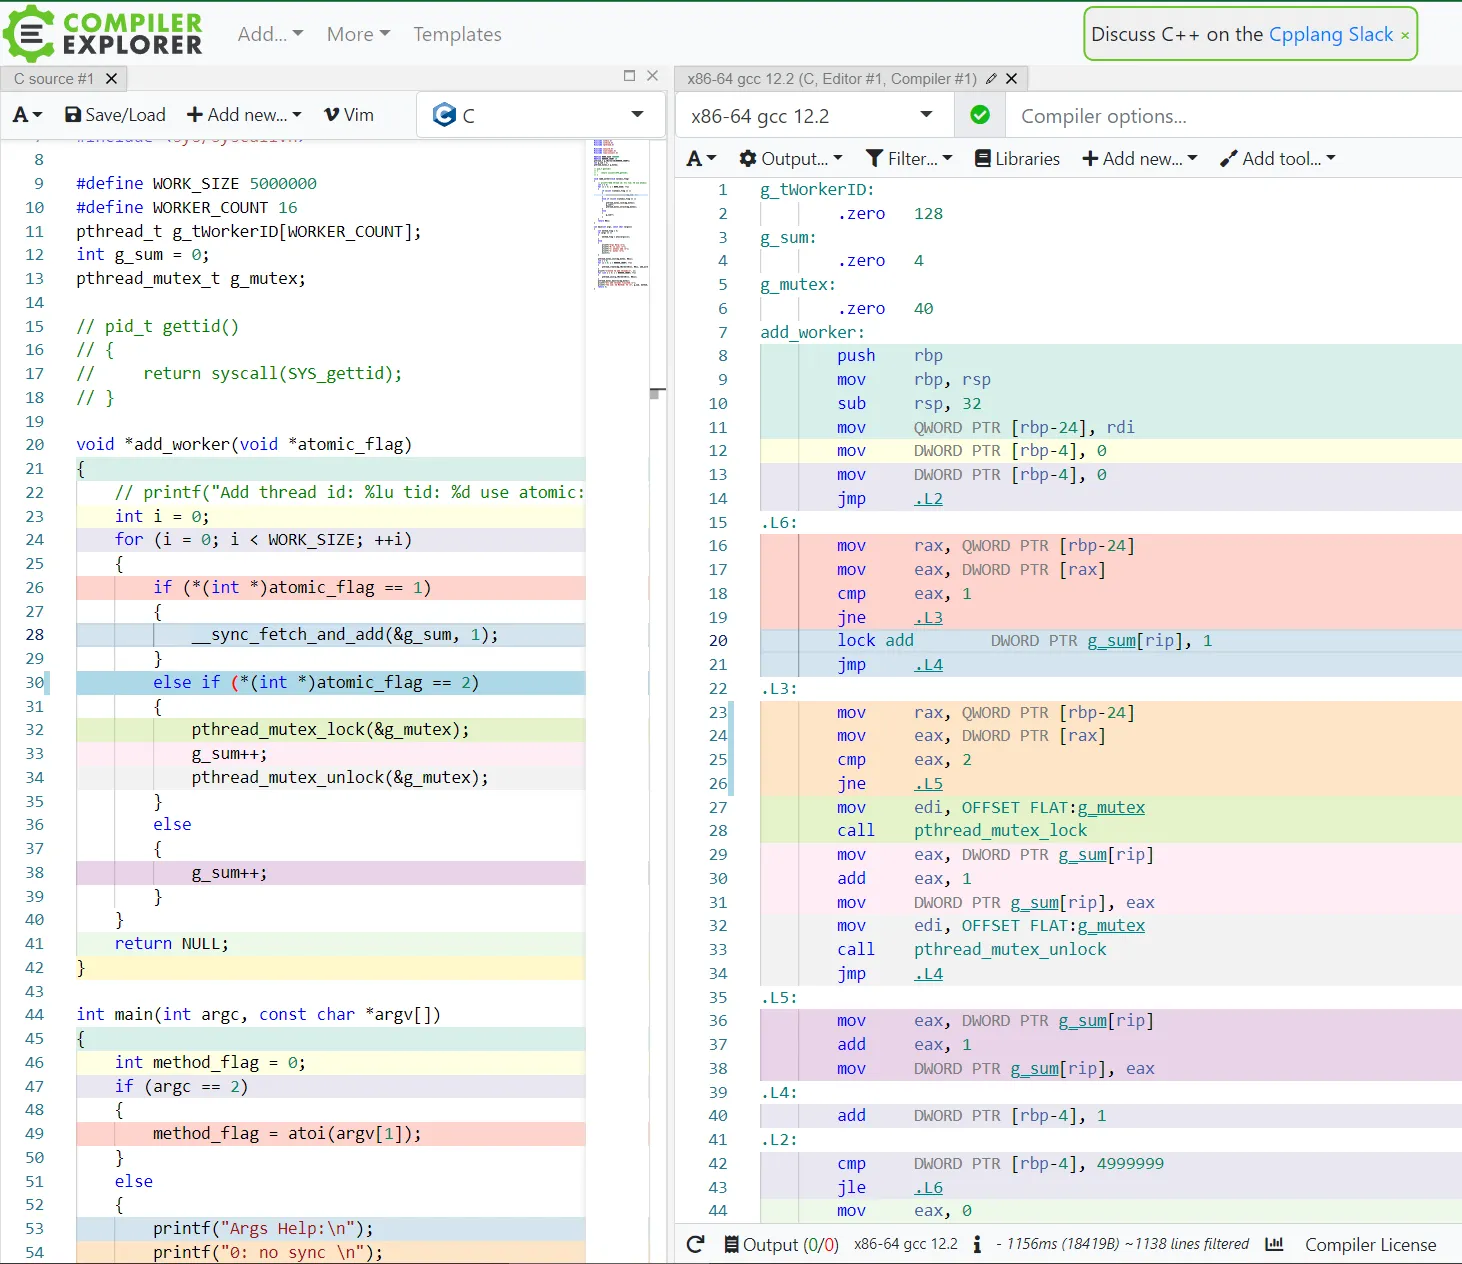
通过 Compiler Explorer (godbolt.org) 查看该代码的汇编结果。
可以发现,原子操作对应的汇编是一个带lock前缀的add指令。
而mutex相关的汇编是两个系统调用,所以这个方式的耗时比原子操作多。
跨进程的原子操作
根据原子操作的理论,如果两个进程通过共享内存的方式共享变量,在这个共享变量上执行原子操作,理论上可以进行跨进程的同步。
在写代码之前,我们先创建个共享内存。当然也可以写代码创建,但是没必要:)
# 创建一个4字节的共享内存
ipcmk --shmem 4

# 查看刚创建的共享内存
lsipc -m
KEY        ID     PERMS OWNER SIZE NATTCH STATUS CTIME CPID LPID COMMAND
0xd4f960f4 1 rw-r--r-- sss 4B 0 23:17 3428 0现在搞一个对共享内存进行操作的代码,add_multithread_ipc.c 内容如下:
#include <stdio.h>
#include <stdlib.h>
#include <pthread.h>

#include <unistd.h>
#include <sys/types.h>
#include <sys/syscall.h>
#include <sys/shm.h>
// 这里比之前扩大了10倍,是为了可以运行更长时间,方便手工运行多个进程。
#define WORK_SIZE 50000000
#define WORKER_COUNT 16
pthread_t g_tWorkerID[WORKER_COUNT];
int *shard_mem_int = NULL;

void *add_worker(void *param)
{
    int i = 0;
    for (i = 0; i < WORK_SIZE; ++i)
    {
        __sync_fetch_and_add(shard_mem_int, 1);
    }
    return NULL;
}

int main(int argc, const char *argv[])
{
    int shm_id = 0;
    if (argc == 2)
    {
        shm_id = atoi(argv[1]);
    }
    else
    {
        printf("Help:\n");
        printf("args: shm_id \n");
    }
    // 将共享内存连接到当前的进程地址空间
    shard_mem_int = shmat(shm_id, 0, 0);
    int i = 0;
    for (i = 0; i < WORKER_COUNT; ++i)
    {
        pthread_create(&g_tWorkerID[i], NULL, add_worker, NULL);
    }
    printf("Created %d add threads\n", i);
    for (int i = 0; i < WORKER_COUNT; ++i)
    {
        pthread_join(g_tWorkerID[i], NULL);
    }

    printf("All add threads finished.\n");
    // printf("此处需要额外的同步操作,才能在多个进程中打印出相同的值\n如果没有等待操作,先完成的进程打印的值是个中间值。\n");
    // printf("按任意键继续运行!");
    // getchar();
    printf("The sum: %d shared mem id: %d \n", *shard_mem_int, shm_id);
    // 分离共享内存
    shmdt(shard_mem_int);
    return 0;
}
编译:
gcc add_multithread_ipc.c运行:
这里我们假设在两个终端运行两个进程,并且共享内存的id是1。
# 进程一的运行和结果
time ./a.out 1
Created 16 add threads
All add threads finished.
The sum: 1542497496 shared mem id: 1
./a.out 1  170.61s user 0.09s system 614% cpu 27.767 total

# 进程二的运行和结果(与进程一在不同终端同时启动)
time ./a.out 1
Created 16 add threads
All add threads finished.
The sum: 1600000000 shared mem id: 1
./a.out 1  172.11s user 0.13s system 638% cpu 26.977 total
可以观察到进程一的结果不是16亿,这是由于进程一先结束导致的,他无法观察到最后结果。
进程二的结果是16亿,符合预期。
在运行过程中,多次实验可能会导致整形溢出。所以提供两个小工具,用于查询当前共享内存的值与重置共享内存。
查询共享内存的值read_ipc.c代码如下:
#include <stdio.h>
#include <stdlib.h>
#include <pthread.h>

#include <unistd.h>
#include <sys/types.h>
#include <sys/syscall.h>
#include <sys/shm.h>

int main(int argc, const char *argv[])
{
    int shm_id = 0;
    if (argc == 2)
    {
        shm_id = atoi(argv[1]);
    }
    else
    {
        printf("Help:\n");
        printf("args: shm_id \n");
    }
    int *shard_mem_int = NULL;
    // 将共享内存连接到当前的进程地址空间
    shard_mem_int = shmat(shm_id, 0, 0);
    printf("The value: %d shared mem id: %d \n", *shard_mem_int, shm_id);
    // 分离共享内存
    shmdt(shard_mem_int);
    return 0;
}
编译: gcc read_ipc.c -o read_ipc
运行: read_ipc 1
重置共享内存的reset_ipc.c 代码如下:
#include <stdio.h>
#include <stdlib.h>
#include <pthread.h>

#include <unistd.h>
#include <sys/types.h>
#include <sys/syscall.h>
#include <sys/shm.h>

int main(int argc, const char *argv[])
{
    int shm_id = 0;
    if (argc == 2)
    {
        shm_id = atoi(argv[1]);
    }
    else
    {
        printf("Help:\n");
        printf("args: shm_id \n");
    }
    int *shard_mem_int = NULL;
    // 将共享内存连接到当前的进程地址空间
    shard_mem_int = shmat(shm_id, 0, 0);
    *shard_mem_int = 0;
    printf("reset shared mem id: %d as %d \n", shm_id, *shard_mem_int);
    // 分离共享内存
    shmdt(shard_mem_int);
    return 0;
}
编译: gcc reset_ipc.c -o read_ipc
运行: reset_ipc 1
实验结束,删除共享内存:
# 注意,这里的1是共享内存的id, 需要根据实际情况更改
ipcrm -m 1
参考
linux的C使用pthread_mutex互斥锁和条件变量
Intel® 64 and IA-32 Architectures Software Developer Manuals